Creating Use Case Templates
To create your template, you will need to define two files:
- A YAML file that configures the fields that a user needs to fill when creating a new component that the scaffolder
wizard will render (i.e.
template.yaml) - All the files and folders that the component created by this template will be made of; we will refer to them as skeleton files. Inside the skeleton directory, there must be at least a YAML file containing the definitions of the
component that your template will scaffold (i.e.
catalog-info.yaml)
Those files together with all files and folders related to a template must be stored in your configured Git provider,
the one configured within Witboost (e.g. GitLab). This allows Witboost to register your template by using the repository
URL, pointing to the catalog-info.yaml file.
A common folder structure for templates is as follows:
template.yaml
mkdocs.yml
docs/
├──── index.md
skeleton/
├──────── README.md
├──────── catalog-info.yaml
├──────── mkdocs.yml
├──────── .gitlab-ci.yaml   <--- CI/CD pipeline which will be executed by Use case templates
├──────── docs/
│         └──── index.md
├──────── environments/
│         ├──────────── dev/
│         │             └─── configurations.yaml
│         ├──────────── prod/
│         │             └──── configurations.yaml
│         └──────────── # any other env config goes here
└──────── # any other skeleton files here
Files under environments/<env>/configurations.yaml define environment-specific overrides that will merged in final entity descriptor when rendering it in the scope of a given environment <env>.
On Skeleton Entities these environment-overrides have been replaced by more flexible Environment Parameters. However, they are still supported and can be used if needed.
The configurator can choose between two different strategies:
-
override (default): When merging array values, the array defined in the
configurations.yamlfile will completely replace the array defined in the descriptor. No elements from the original array are preserved.Example
Base descriptor:
endpoints:- url: /amethod: GET- url: /bmethod: POSTconfigurations.yaml:
endpoints:- url: /overridemethod: PUTResult (override):
endpoints:- url: /overridemethod: PUT -
merge: This strategy merges arrays by index position. Each item in an array in the
configurations.yamlfile is merged into the corresponding item at the same index in the base descriptor array.Example
Base descriptor:
endpoints:- url: /amethod: GET- url: /bmethod: POSTconfigurations.yaml:
endpoints:- url: /overridemethod: PUTResult (merge):
endpoints:- url: /overridemethod: PUT- url: /bmethod: POST
Merge strategy can be defined in values.yaml file under the key ui.appConfig.mesh.builder.editAndTest.mergeStrategy.
Step one. template.yaml Definition
Templates are entities, and as such, they can be stored inside the Catalog. This is why they must be compliant with a well-defined structure.
A template definition describes both the parameters that are rendered in the frontend part of the scaffolding wizard and the steps that are executed when scaffolding that component.
A template.yaml definition generally contains these sections, as shown in the example below:
apiVersion: scaffolder.backstage.io/v1beta3
kind: Template
metadata:
# data about the template, useful for the catalog

spec:
  parameters:
  # defines the form fields for the user to insert the data required by the component

  steps:
  # steps performed by the scaffolder engine to effectively create your component

  output:
  # some extra metadata for the scaffolder actions
Let's breakdown more those sections, leveraging an example template that we created.
The metadata section defines information about the template that is meaningful for the Catalog, for display purposes:
apiVersion: backstage.io/v1beta2 # internal, can be leaved as it is
kind: Template # kind will be always `template` when defining a template.yaml
metadata:
  name: example-template # unique id for this template inside the catalog
  title: Example Template # display name
  description: Template definition of an Example Template
  mesh:
    icon: https://<icon_url>.png # icon appearing inside the catalog when displaying this template
  annotations:
    backstage.io/techdocs-ref: dir:. # this is used by TechDocs to know where to look for docs, can be leaved as that
  tags: # tags meaningful for users, they can be used for filtering templates inside the catalog
    - example
The spec section defines:
- template owner (
spec.owner) and the type of the scaffolded entity (spec.type). Thespec.typefield of the template is used in the UI to group templates on the "Template" page (templates with the same type field will be grouped). You can put types in camel case and they will be displayed using spaces in the UI groupings. - the parameters (
spec.parameters) that are presented to the user in a form, detailing the mandatory/optional ones (" required")
spec:
  owner: agilelab
  type: component # or any other available type
  parameters:
    - title: Example Page # title of the scaffolder page
      required:
        - fieldone
        - fieldtwo
      properties:
        fieldone:
          title: Name
          type: string
          description: Name of the example component
        fieldtwo:
          title: Owner
          type: string
          description: Owner of the example component
          ui:field: EntityPicker # a custom picker
          ui:options: # with custom options values
            allowArbitraryValues: false
            allowedKinds:
              - User
        fieldthree:
          title: Description
          type: string
          description: Description of the example component

    - title: Example Page for Location Selection
      required:
        - repoUrl
      properties:
        repoUrl:
          title: Repository Location
          type: string
          ui:field: RepoUrlPicker # another custom picker
          ui:options:
            allowedHosts:
              - gitlab.com
Moreover, spec also defines:
spec.generates: This field is required if the template instantiates a system or component entity and includes afetch:templateaction. See the Practice Shaper section below- Steps performed by the scaffolder
- Values
spec.steps[template].valuespassed to all files in the skeleton (including thecatalog-info.yaml) when a new component is cloned. So that inside theskeletonyou can refer to those values with the assigned key ( e.g.values.fieldone) spec.steps[template].useCaseTemplateId: It is the unique Id that will be used to register the Use Case Template to the Provisioning Coordinatorspec.steps[template].infrastructureTemplateId: It is the unique ID that will be used to register a Tech Adapter to the Provisioning Coordinator.
Remember: all URNs are treated as case-insensitive values, except for infrastructureTemplateId. This is deprecated, in the future it will be all case-insensitive.
spec:
  # we are still in the same section as in the above example
  steps:
    - id: template # fetches values from UI
      name: Fetch Skeleton + Template #
      action: fetch:template
      input:
        url: ./skeleton # this is used to locate catalog-info.yaml
        copyWithoutRender: # you can also specify files that will not be affected by variables replacement
          - .gitlab-ci.yml
        values:
          fieldone: '{{ parameters.fieldone }}'
          fieldtwo: '{{ parameters.fieldtwo }}'
          fieldthree: '{{ parameters.fieldthree }}'
          useCaseTemplateId: urn:dmb:utm:aws-cdp-outputport-impala-template:0.0.0 # Specify any well-formatted Id you desire
          infrastructureTemplateId: urn:dmb:itm:aws-cdp-outputport-impala-provisioner:1 # Specify any well-formatted Id you desire
          useCaseTemplateVersion: 0.0.0
    - id: publish # custom action that publishes the example component to GitLab
      name: Publish
      action: witboostMeshComponent:publish:gitlab
      input:
        allowedHosts: ['gitlab.com']
        description: 'This is {{ parameters.fieldone}}'
        repoUrl: '{{ parameters.repoUrl }}'

    - id: register # register the example component into witboost entities
      name: Register
      action: catalog:register
      input:
        repoContentsUrl: '{{ steps.publish.output.repoContentsUrl }}'
        catalogInfoPath: '/{{ parameters.rootDirectory }}/catalog-info.yaml'

  output:
    remoteUrl: '{{ steps.publish.output.remoteUrl }}'
    entityRef: '{{ steps.register.output.entityRef }}'
If you are not using Gitlab, as in the example, please refer to the Git Providers section below
template.yaml has some requirements to which it must be compliant:
- Field
metadata.titleandmetadata.descriptionare mandatory fields - Field
spec.steps.values.useCaseTemplateId: Must match the following URN format:urn:dmb:utm:{name}:{version}(note that is utm) - Field
spec.steps.values.infrastructureTemplateIdmust match the URN identifierurn:dmb:itm:{name}:{version} - Field
spec.steps.values.useCaseTemplateVersionmust be not empty and should equal to the{version}in theuseCaseTemplateIdfield.
Moreover:
- allowed characters in
{name}section are alphanumeric ([a-z] and/or [A-Z] and/or [0-9]) and/or dashes (-) and/or underscores (_) only - allowed format for
{version}section must be a single positive number (e.g.13) or a dot-separated sequence of three numbers (e.g.1.11.16) - Use case template URN starts with urn:dmb:utm while an Infrastructure template URN starts with urn:dmb:itm
Notice that the registration step will reject your request of creating a new component if such mandatory requirements are not fulfilled.
All the input values defined in template.yaml (spec.steps[template].values) will be available to be referenced
from the catalog-info.yaml and all files inside the skeleton folder using the values variable (
e.g. values.fieldone).
So, now that we have a template.yaml ready, we should now map all user inputs to catalog-info.yaml which will define the structure of your component.
Publish step
The publishing step is in charge of creating the repository if that does not exist, and publishing all files and contents generated from the scaffolding phase into a destination SCM provider.
When integrating with an SCM provider (like Gitlab), the templates for all the entities handled by witboost must use
specific actions for publication and registration.
This is because each provider needs different input parameters, and the data used to perform the operations can differ (
e.g. for Bitbucket all the URLs must end with ?at={branchName}).
Gitlab
An example of valid Gitlab template's actions in the template.yaml file looks like the following:
- id: publish
  name: Publish
  action: witboostMeshComponent:publish:gitlab
  input:
    allowedHosts: ['gitlab.com']
    description: 'This is ${{ parameters.name }}'
    repoUrl: '${{ parameters.repoUrl }}'
    rootDirectory: '${{ parameters.rootDirectory }}'
    parentRef: '${{ parameters.name }}'

- id: register
  name: Register
  action: catalog:register
  input:
    repoContentsUrl: '${{ steps.publish.output.repoContentsUrl }}'
    catalogInfoPath: '/${{ parameters.rootDirectory }}/catalog-info.yaml'
The publish action is a custom action that takes care of creating the repository for a project on the Gitlab target
repository. The inputs that must be passed, as shown above, are the target host, the description, the repository URL and
root directory (extracted from the RepoUrlPicker), and the System name.
Please note that the extract above is valid for a System template, while when used for a Component template
the parentRef line should be changed to refer to the System chosen in the steps above (e.g. with
an EntityPicker or an EntitySearchPicker with name parentRef):
parentRef: '${{ parameters.parentRef }}'
The register action simply takes the output of the publish action and registers the published repository as an entity in the database.
Bitbucket Server
An example of valid on-premise Bitbucket template actions in the template.yaml file looks like the following (for a System template):
- id: publish
  name: Publish
  action: witboostMeshComponent:publish:bitbucketServer
  input:
    allowedHosts: ['mybitbucket.com']
    description: 'This is ${{ parameters.name }}'
    repoUrl: '${{ parameters.repoUrl }}'
    rootDirectory: '${{ parameters.rootDirectory }}'
    parentRef: '${{ parameters.name }}'

- id: register
  name: Register
  action: catalog:register
  input:
    catalogInfoUrl: '${{ steps.publish.output.catalogInfoUrl }}'
The publish action is a custom action that takes care of creating the repository for a System on the on-premise
Bitbucket target repository (you can see that the host does not reference the global bitbucket.org cloud). The inputs
that must be passed, as shown above, are the target host, the description, the repository URL and root directory (
extracted from the RepoUrlPicker), and the System name.
Please note that the extract above is valid for a System template, while when used for a Component template
the parentRef line should be changed to refer to the System chosen in the steps above (e.g. with
an EntityPicker or an EntitySearchPicker with name parentRef):
parentRef: '${{ parameters.parentRef }}'
The register action simply takes the output of the publish action and registers the published repository as an entity in
the database.
Note that the register action is the Backstage default one, so you can refer to the default documentation to change its
behavior. Anyway, in this case, it is mandatory to use the URL generated by the publish step as input; this is because the URL must have the ?at={branchName} suffix, and the publish action already creates the URL that way.
Azure DevOps
An example of valid Azure DevOps template actions in the template.yaml file looks like the following:
- id: publish
  name: Publish
  action: witboostMeshComponent:publish:azure
  input:
    allowedHosts: ['dev.azure.com']
    description: This is ${{ parameters.name }}
    rootDirectory: ${{ parameters.rootDirectory }}
    repoUrl: ${{ parameters.repoUrl }}
    parentRef: '${{ parameters.name }}'

- id: register
  name: Register
  action: catalog:register
  input:
    catalogInfoUrl: '${{ steps.publish.output.catalogInfoUrl }}'
The publish action is a custom action that takes care of creating the repository for a System on Azure target repository. The inputs
that must be passed, as shown above, are the target host, the description, the repository URL and root directory (
extracted from the RepoUrlPicker), and the System name.
Please note that the extract above is valid for a Data Product template, while when used for a Component template
the parentRef line should be changed to refer to the System chosen in the steps above (e.g. with
an EntityPicker or an EntitySearchPicker with name parentRef):
- id: publish
  name: Publish
  action: witboostMeshComponent:publish:azure
  input:
    allowedHosts: ['dev.azure.com']
    description: This is ${{ parameters.name }}
    rootDirectory: ${{ parameters.rootDirectory }}
    repoUrl: ${{ parameters.repoUrl }}
    parentRef: '${{ parameters.parentRef }}'
The register action simply takes the output of the publish action and registers the published repository as an entity in the database.
Default values
When creating a new data product or component from a template in Azure, you can specify some default values from the configuration,
in order to customize the creation of the corresponding project, if not existent. The values are the following, to be put in the values.yaml:
mesh:
  builder:
    scaffolder:
      azure:
        defaultValues:
          projectDescription: test description
          projectVisibility: 1
          projectTemplateType: basic
where:
projectDescription[string]: default description value when a new project is created by the action. If not provided, default is ''.projectVisibility[string]: default visibility value when a new project is created by the action. If not provided, default isOrganization, with fallback toPrivate. Available visibilities are the following:- Private =
0: The project is only visible to users with explicit access - Organization =
1: Enterprise level project visibility - Public =
2: The project is visible to all. - SystemPrivate =
3
- Private =
projectTemplateType[string]: default template type value when a new project is created by the action. If not provided, default isBasic. Available template types are:basic: This template is flexible for any process and great for teams getting started with Azure DevOps.agile: This template is flexible and will work great for most teams using Agile planning methods, including those practicing Scrum.cmmi: This template is for more formal projects requiring a framework for process improvement and an auditable record of decisions.scrum: This template is for teams who follow the Scrum framework.
GitHub
An example of valid GitHub template actions in the template.yaml file looks like the following:
- id: publish
  name: Publish
  action: witboostMeshComponent:publish:github
  input:
    allowedHosts:
      - github.com
    description: This is ${{ parameters.name }}
    repoUrl: ${{ parameters.repoUrl }}
    parentRef: '${{ parameters.parentRef }}'
    rootDirectory: ${{ parameters.rootDirectory }}
In addition, you can set the following parameters for the input section:
homepage[string]: the repository's homepage URL. This is the URL that will be displayed in the repository's About section;deleteBranchOnMerge[boolean]: Delete the branch after merging the PR. The default value is 'false';allowMergeCommit[boolean]: Allow merge commits. The default value is 'true';allowSquashMerge[boolean]: Allow squash merges. The default value is 'true';squashMergeCommitTitle[string]: Sets the default value for a squash merge commit title. Can have values 'PR_TITLE' or 'COMMIT_OR_PR_TITLE'. The default value is 'COMMIT_OR_PR_TITLE';squashMergeCommitMessage[string]: Sets the default value for a squash merge commit message. Can have values 'PR_BODY', 'COMMIT_MESSAGES', or 'BLANK'. The default value is 'COMMIT_MESSAGES';allowRebaseMerge[boolean]: Allow rebase merges. The default value is 'true';allowAutoMerge[boolean]: Allow individual PRs to merge automatically when all merge requirements are met. The default value is 'false';access[string]: Sets an admin collaborator on the repository. Can either be a user reference different from 'owner' in 'repoUrl' or team reference, eg. 'org/team-name';collaborators[array<object>]: Provide additional users or teams with permissions. This is an array of objects with the following properties:access[string]: The type of access for the user';user[string]: The name of the user that will be added as a collaborator. At least one of 'user' or 'team' must be provided;team[string]: The name of the team that will be added as a collaborator. At least one of 'user' or 'team' must be provided;
hasProjects[boolean]: Enable projects for the repository. The default value is 'true' unless the organization has disabled repository projects;hasWiki[boolean]: Enable the wiki for the repository. The default value is 'true';hasIssues[boolean]: Enable issues for the repository. The default value is 'true';topics[array<string>]: Array of topics for the repository. These are used to help people find your repository, and will be listed in the repository's About section;repoVariables[object]: Variables attached to the repository. This is an object with custom keys. Every key will be a variable name, and the value will be the variable value;oidcCustomization[object]: OIDC customization template attached to the repository. This is an object with the following properties:useDefault[boolean]: Boolean that represents whether to use the default OIDC template or not;includeClaimKeys[array<string>]: Array of unique strings (key claims). Each claim key can only contain alphanumeric characters and underscores.
repoVisibility[string]: Specifies the visibility level of the repository. Can have values 'private', 'internal' or 'public'. The default value is 'private'.
Publishing in multiple repositories
It is possible to publish to more than one repository starting from one template. In that case, you would probably want
to create two separate fetch, publish and register phases. Here we are introducing the input.sourcePath value in
the publish phase which is used to read from the folder specified in the input.targetPath of the fetch phase so these
two variables must be an exact match. An example of this is:
  steps:
    - id: templateOne
      name: Fetch Skeleton + Template
      action: fetch:template
      input:
        url: ./skeleton
        targetPath: '${{ parameters.rootDirectory }}'
        values:
          ...
          identifier: '${{ parameters.identifier }}One'
          destination: '${{ parameters.repoUrl | parseRepoUrl }}One'
          ...
    - id: publishOne
      name: Publish
      action: witboostMeshComponent:publish:gitlab
      input:
        allowedHosts: [ 'gitlab.com' ]
        description: 'This is ${{ parameters.name }}'
        repoUrl: '${{ parameters.repoUrl }}'
        rootDirectory: '${{ parameters.rootDirectory }}'
        parentRef: '${{ parameters.parentRef }}'

    - id: registerOne
      name: Register
      action: catalog:register
      input:
        repoContentsUrl: '${{ steps.publishOne.output.repoContentsUrl }}'
        catalogInfoPath: '/${{ parameters.rootDirectory }}/catalog-info.yaml'

    - id: templateTwo
      name: Fetch Skeleton + Template
      action: fetch:template
      input:
        url: ./skeleton
        targetPath: '${{ parameters.rootDirectory }}/two'
        values:
          ...
          identifier: '${{ parameters.identifier }}Two'
          destination: '${{ parameters.repoUrl | parseRepoUrl }}Two'
          ...
    - id: publishTwo
      name: Publish
      action: witboostMeshComponent:publish:gitlab
      input:
        allowedHosts: [ 'gitlab.com' ]
        description: 'This is ${{ parameters.name }}'
        repoUrl: '${{ parameters.repoUrl }}Two'
        rootDirectory: '${{ parameters.rootDirectory }}'
        parentRef: '${{ parameters.parentRef }}'
        sourcePath: 'two'
    - id: registerTwo
      name: Register
      action: catalog:register
      input:
        repoContentsUrl: '${{ steps.publishTwo.output.repoContentsUrl }}'
        catalogInfoPath: '/${{ parameters.rootDirectory }}/catalog-info.yaml'

  output:
    links:
      - title: Repository
        url: '${{ steps.publish.output.remoteUrl }}'
      - title: Open in catalog
        icon: catalog
        entityRef: '${{ steps.register.output.entityRef }}'
      - title: Repository
        url: '${{ steps.publishTwo.output.remoteUrl }}'
      - title: Open in catalog
        icon: catalog
        entityRef: '${{ steps.registerTwo.output.entityRef }}'
Be really careful NOT to use special characters(for example -) in the id of the publishing phase!
Step two. catalog-info.yaml Definition
The catalog-info.yaml file, that must be defined inside the skeleton folder, will be used as the YAML definition of the entity that will be created by the template. Refer to the Witboost Entities Overview for more details.
As other files in the skeleton folder, it can be a Nunjucks template referencing variables defined in templates.yaml.
Example:
apiVersion: backstage.io/v1alpha1
kind: Component # this is one of the allowed catalog kinds, and should not be changed, since it will affect how entities are handled inside witboost
metadata:
  name: ${{ values.fieldone }}
  description: ${{ values.fieldthree }}

spec:
  # fixed fields
  type: component
  lifecycle: experimental
  owner: ${{ values.fieldtwo }}
  mesh:
    # custom fields
    componentOwner: ${{ values.fieldtwo }}
    useCaseTemplateId: ${{ values.useCaseTemplateId }}
    infrastructureTemplateId: ${{ values.infrastructureTemplateId }}
    version: 0.0.0 # Specify whatever component version you desire

    specific: # all extra fields goes here
Attention:
- The metadata.name field supports only
[a-z0-9+#]separated by[-], no spaces or other special characters are allowed here - tags field is following the same rule
Instantiation
The instantiation phase is the process that takes place when a user creates a new entity using a Creation Template. It reads:
- The contents of the
skeletonfolder inside the template repository. - The parameter values provided by the user through the visual wizard.
- The values defined under
spec.steps[template].valuesintemplates.yaml.
Then it generates and writes files into the new entity's repository.
There are two distinct behaviors during instantiation, depending on whether the entity being created is a Skeleton Entity or a Legacy Entity.
Skeleton entities
Skeleton Entities are the recommended and standard approach for defining systems and components in Witboost since version 2.3.
To instruct the template to instantiate an entity as a Skeleton Entity, simply place the %SKELETON directive at the top of the catalog-info.yaml file in the template's skeleton folder. This directive activates special handling during the instantiation phase.
Example:
%SKELETON
kind: System
metadata:
  name: finance.cashflow.2
  description: ${{ parameters.description }}
spec:
  type: dataproduct
  lifecycle: ${{ parameters.lifecycle }}
  owner: group:witboost
  domain: domain:finance
  mesh:
    name: ${{ parameters.displayName }}$
    version: ${{ parameters.version.major }}.${{ parameters.version.minor }}.${{ parameters.version.patch }}$
    fullyQualifiedName: Liquidity ${{ parameters.displayName }}s
    maturity: ${{ values.maturity }}$
During instantiation of a Skeleton Entity:
- The
catalog-info.yamlfile is copied as-is into the new entity's repository. It retains all Nunjucks templating expressions and is not rendered at this stage. - A
parameters.yamlfile is created in the entity's repository, with the following structure:parameters:— this section is populated with user-provided inputs, as defined in thespec.parameterssection oftemplate.yaml. Each parameter appears using a 1:1 name match with its definition intemplate.yaml; their values are collected through the visual wizard at instantiation time.values:— this section is populated as-is from thespec.steps[template].valuessection oftemplate.yaml. This includes any default or computed values meant to be available inside the skeleton for compatibility with older templates that rely onvalues.readonly:— see note below.environmentParameters:- see section below.
- If the template's
skeletonfolder already includes aparameters.yamlfile, it will be merged during instantiation:- Any new values provided during instantiation override those in the existing file.
- This allows for default values to be pre-configured while still honoring user input.
This approach results in a new entity's repository where the YAML structure is dynamic, and values are maintained separately, improving maintainability and tooling integration.
Reserved Parameters are special fields automatically handled by Witboost during the entity lifecycle (e.g., versioning, registration). These can appear in either the readonly: section of parameters.yaml or — in some cases — under parameters:.
Key behaviors:
- Witboost automatically infers and generates reserved parameters like
__name__,__version__, and__instanceOf__if they are not explicitly set in the template. - They can be predefined in the template's
skeleton/parameters.yamlto override or set default values. - They are injected into the final
parameters.yamlfile under the appropriate section (readonlyorparameters). - These values are accessible inside
catalog-info.yamlusing standard Nunjucks syntax:
${{ readonly.__version__ }},${{ parameters.dependsOn }}, etc.
See the full list in Reserved Parameters.
Environment Parameters
Environment parameters customize the skeleton's behavior based on the specific environment (production, development, etc.) in which it is rendered. They are defined in the environmentParameters section of parameters.yaml, and accessible from the catalog-info.yaml when rendering the skeleton for a specific environment.
Refer to the Environment Parameters documentation for more information.
If you want users to provide environment-specific values during template instantiation, mark one of the spec.parameters sections in your template.yaml with
environmentParameters: true
Once enabled, Witboost automatically:
- Duplicates the section in the Creation Wizard UI — one panel for each available environment (dev, qa, prod, etc.)
- Collects user inputs into the
environmentParameterssection of the generated parameters.yaml
Example:
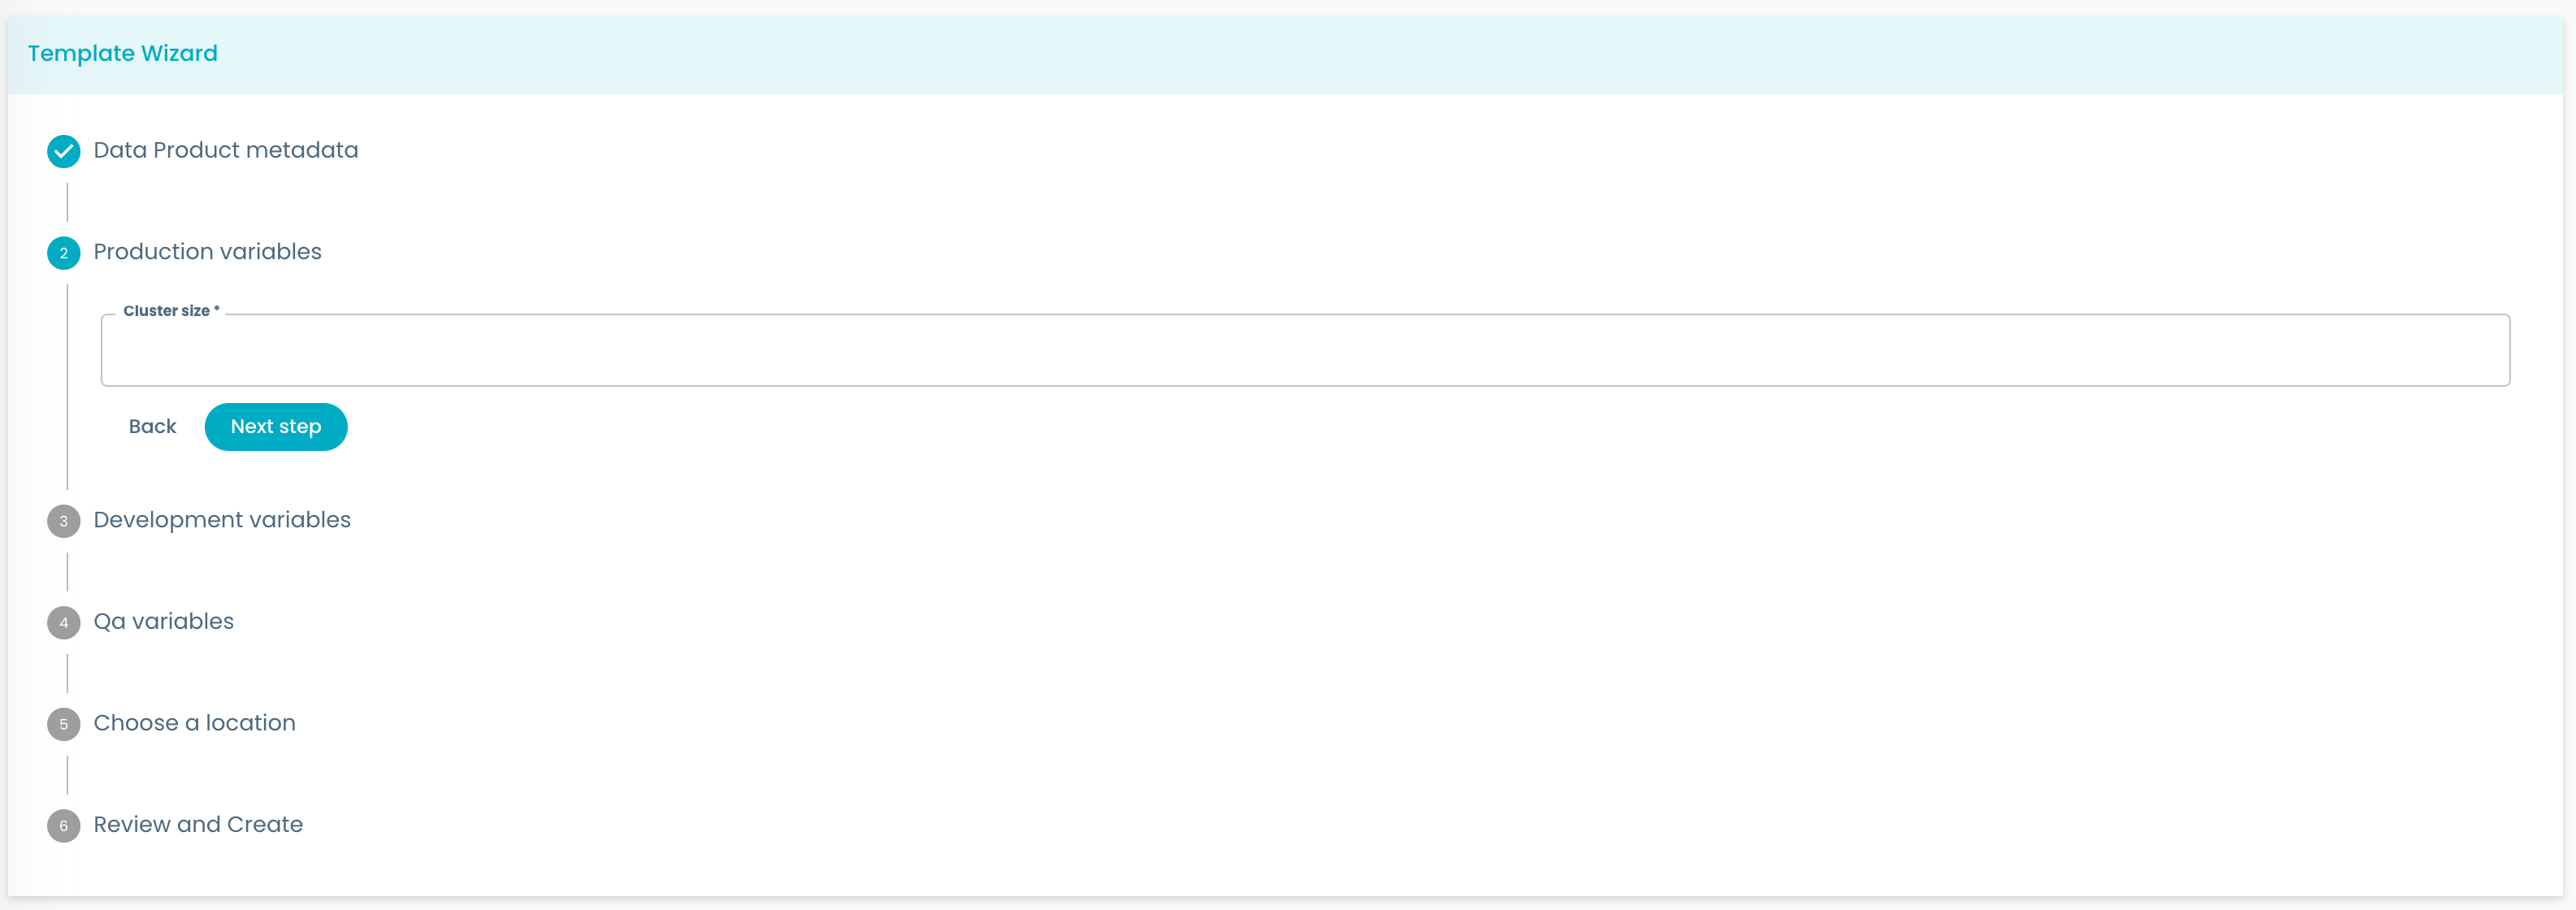
kind: Template
# ...
spec:
  parameters:
    - title: Environment Parameters
      environmentParameters: true # enable environment parameters
      properties:
        clusterSize:
          title: Cluster Size
          type: string
Using this example, the form will look like the one in the image.
Limitations
- At most one environment parameters section can be enabled per template.
- Pickers in an environment parameters section cannot be referenced by other pickers in the template, even if they are in the same environment parameters section.
Legacy entities
Legacy Entities follow an older pattern where catalog-info.yaml is treated as a static file.
During instantiation of a Legacy Entity:
- The
catalog-info.yamlfile is rendered immediately, using the Nunjucks engine and values fromspec.steps[template].values. - The rendered output is saved into the entity's repository as a static YAML file.
- No
parameters.yamlfile is created. - You cannot reference
parameters,readonlyorenvironments parametersin theskeleton/catalog-info.yaml, onlyvaluesdefined intemplate.yaml(spec.steps[template].values).
This approach was standard prior to Witboost 2.3 for systems and components, however it is now considered a legacy pattern for these entity types. New systems and components should be defined as Skeleton Entities, which offer better tooling support, easier maintainability, and improved integration with Witboost's visual tools.
Skeleton vs Legacy Entities Summary
| Feature | Skeleton Entities | Legacy Entities |
|---|---|---|
Declared via %SKELETON | ✅ Yes | ❌ No |
| Dynamic rendering (delayed) | ✅ Rendered at runtime | ❌ Rendered at instantiation |
parameters.yaml file created | ✅ Yes | ❌ No |
| Parameters usable in template | ✅ parameters, readonly, values, environments parameters | ❌ Only values |
| Recommended for systems/components | ✅ Yes | ❌ Deprecated |
Step three. skeleton folder
The skeleton folder contains all the files and directories that will be copied into the newly created repository during the instantiation of a Use Case Template.
At a minimum, it must include the required files for entity definition — namely catalog-info.yaml and, optionally, parameters.yaml — which have been described in detail above.
In addition to those, the folder can include any other resources necessary to scaffold a fully functional repository, such as:
- Documentation files (e.g.,
README.md,docs/) - Configuration files
- Source code, scripts, or boilerplate directories
These files can include Nunjucks templating expressions and will be rendered at instantiation using the values provided in template.yaml (spec.steps[template].values). Use the values variable to inject dynamic content (e.g., ${{ values.fieldone }}) into any of these files.
This allows you to fully customize the structure and content of the generated repository beyond the entity metadata itself.
All files in the skeleton folder except catalog-info.yaml are always processed at instantiation time. Their templated expressions (e.g., ${{ values.xxx }}) are replaced immediately using the values defined in template.yaml. This applies to both Skeleton and Legacy Entities.
As a result, documentation, configuration files, and code files included in the template will always be fully resolved before being committed to the generated repository.
Enabling docs generation in your components
In the template definition, there are two customizable points that you can leverage to increase the user experience for witboost users:
- in the template repository, you can define a
mkdocs.yamlfile and adocsdirectory to let users better understand what the template will create once selected for creation.
- Create a
mkdocs.ymlfile in the root of your repository that will have the following content:
site_name: 'example-docs'
nav:
  - Home: index.md
plugins:
  - techdocs-core
- Update your template definition by adding the following lines to its
template.yamlfile in the root of the repository:
metadata:
  annotations:
    backstage.io/techdocs-ref: dir:.
- Create a
/docsfolder in the root of your repository with at least anindex.mdfile in it. (If you add more markdown files, make sure to update the nav in themkdocs.ymlfile to get proper navigation for your documentation.) Note - Although docs is a popular directory name for storing documentation, it can be renamed to something else and can be configured by mkdocs.yml. See https://www.mkdocs.org/user-guide/configuration/#docs_dir
- you can add an icon to your template that will be displayed in the templates page by adding a public png URL in
the
template.yamlfile, like:
metadata:
  mesh:
    icon: https://path.to.a.public/image.png
Step four. Registering a Use Case Template
You can add the template using the catalog-import plugin, which you can find in Administration > Templates page by clicking on Register Template.
Inside the page, you will need to link the committed template.yaml file; make
sure to not commit the template to a branch with slashes (e.g. feature/branch-name) since the plugin will not be able to figure out the right path in this case.

Otherwise, you can add the template files to the catalog through static location configuration. For example:
catalog:
  locations:
    - type: url
      target: https://github.com/backstage/software-templates/blob/main/scaffolder-templates/react-ssr-template/template.yaml
      rules:
        - allow: [Template]
Attention:
- the url you register to import the template must refer to the template yaml file and should be related to a specific branch (like in the above example)
Refer to Backstage documentation to know more about it.
Practice Shaper
Use Case Templates are nodes of the Practice Shaper graph. Their role is to help in creating instances of system and component types.
As extensively described in the Practice Shaper documentation, every template should define a spec.generates property referencing the system type or component type of the system/component instances it generates.
The spec.generates property is mandatory when the template instantiates a system or component and includes a fetch:template action.
fetch:template uses the value of spec.generates to automatically fill the spec.instanceOf property of the generated system or component instance — through the readonly.__instanceOf__ parameter in case of skeleton entities.